7 Essential Tips for Photographing Schools of Fish Like a Pro
Photographing schools of fish is an exhilarating and captivating experience. Their synchronised movements create stunning patterns, and when captured well, these images can become mesmerising pieces of art. However, shooting schooling fish presents unique challenges that require a blend of technical expertise, artistic vision and patience.
Whether you are a novice or an experienced underwater photographer looking to enhance your skills, these seven essential tips will guide you in mastering the art of photographing schools of fish like a pro. By fine-tuning your equipment, learning about fish behaviour, and employing effective lighting and composition techniques, you can elevate your underwater photography game.
7 Essential Tips for Mastering the Art of Photographing Schools of Fish
1. Gear Up: Wide-Angle Lens and Proper Strobe Placement
To effectively capture the dynamic nature of schooling fish, a wide-angle lens is indispensable. Wide-angle lenses allow you to capture the full scope of a school in one frame, giving your shots a sense of scale and grandeur. Popular choices among professionals include fisheye lenses, such as the Tokina 10–17mm, which provide a wide field of view with minimal distortion. This is particularly useful when you are working in close proximity to your subjects.
Lighting in wide-angle underwater photography poses a greater challenge than in macro photography due to the larger subjects or scenes you are working with. It can be difficult to fully illuminate a wide scene with just strobe light, and the added challenge comes from backscatter — the tiny white specks caused by light bouncing off particles in the water. This can ruin your shot, along with the possibility of creating distracting hot spots in your images from overly reflective fish.
To avoid these issues, position your strobes wide, slightly behind the housing of your camera, and angled outward. This technique helps minimise backscatter and prevents harsh reflections from highly reflective fish, allowing for a more balanced exposure that maintains the natural beauty of the scene.

2. Camera Settings: Shutter Speed, Aperture and ISO
When adjusting your aperture, think about your distance from the school of fish.
For shots taken from a distance, an aperture of F5.6 is suitable; for mid-range subjects, F8 works well; and for close-ups in well-lit conditions, F11 will give you sufficient depth of field to keep both the foreground and background sharp.
If you find yourself in low-light conditions or at deeper depths, you may need to increase your ISO to maintain proper exposure. Raising the ISO, up to 800 or higher depending on your camera’s capabilities, helps balance the need for fast shutter speeds and smaller apertures without sacrificing image quality. This balance is critical for capturing well-exposed images in the often challenging underwater environment.


Achieving the right camera settings is crucial for freezing action and ensuring sharpness in your images.
Schools of fish are often in constant motion, so you’ll want to use a fast shutter speed — at least 1/125th of a second, but preferably faster.
For larger schools or particularly speedy species, consider increasing your shutter speed to 1/250th or even 1/500th to ensure you capture the action without motion blur.
3. Composition: Create Depth with Strategic Framing
Capturing the grandeur of a school of fish requires more than just technical precision; it demands creative composition as well. One effective way to add depth to your shots is by positioning yourself below the school and shooting upwards. This perspective gives a sense of scale and showcases the fish against the surface, often allowing for beautiful lighting or rippling water as a backdrop.
As schools of fish move together, they often form fascinating patterns such as circles, lines or spirals. Use these natural formations to create leading lines in your composition. Leading lines guide the viewer’s eye through the image, making it more visually engaging.


For even more dramatic results, frame the school against colourful coral reefs, sea fans or other underwater elements.


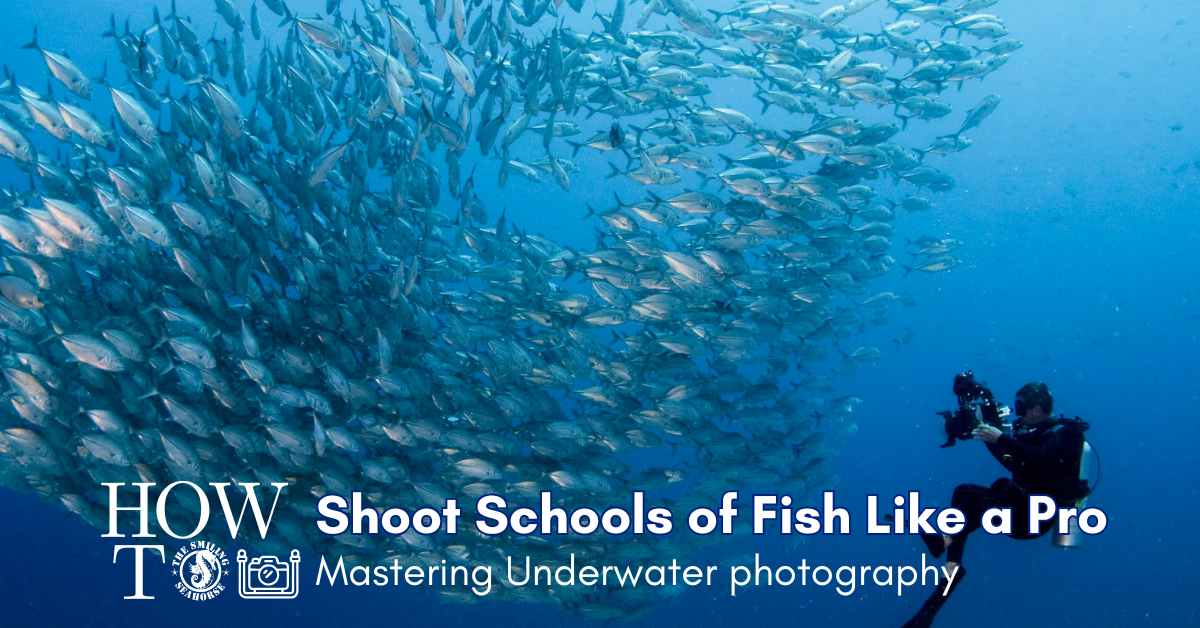
Another useful composition technique is to incorporate divers or larger marine animals into the frame. This approach provides a sense of scale and can make the image more immersive, helping viewers appreciate the size and movement of the school.
4. Mastering Natural Light and Strobes
Understanding how light behaves underwater is essential for capturing stunning images. The quality of light changes dramatically as you descend, with colours fading and shifting at greater depths. Shallow waters often allow for vibrant colours and clear visibility, while deeper dives may require careful consideration of your lighting options. In shallow, clear waters, natural light can create beautiful effects, especially if you shoot upwards towards the surface.


However, as you dive deeper, relying more on strobes becomes necessary to bring out the true colours of the fish and prevent a washed-out appearance in your images.
The key to effective strobe use lies in balancing artificial lighting with available ambient light. When photographing schools of silvery or reflective fish, it’s wise to turn down your strobe power to avoid hot spots and overexposure. Instead of directly front-lighting your subjects, try using side or backlighting. This technique creates shadows that emphasise the textures and shapes of the fish, enhancing the visual impact of your photos without overwhelming the viewer with bright reflections.

5. Predict Fish Behaviour: Anticipate Movement for Better Shots
Understanding fish behaviour is critical for capturing compelling images. Schools of fish often change direction rapidly, and they may scatter if they sense a predator or diver approaching. Spend some time observing their movements before you begin shooting. This patience will allow you to anticipate where the school may move next, enabling you to position yourself effectively.
When approaching the school, try to do so slowly and quietly. The sound of your bubbles can easily startle fish and cause them to disperse. By moving gently and minimising sudden movements, you can get closer to the school without disturbing their natural formation. If the fish do scatter, take a moment to wait and observe, as they will likely regroup and resume their previous behaviour.
It can also be helpful to use your dive buddy to your advantage. By coordinating with them, you can create a natural pathway for the fish to follow, leading them closer to you for the perfect shot.


6. Use Depth and Scale to Your Advantage
One of the most impressive aspects of a large school of fish is its sheer scale. To convey this sense of magnitude in your photographs, consider incorporating elements that provide context, such as a diver, a coral reef or other marine life. This not only adds interest to the shot but also helps viewers appreciate the size and beauty of the school.


To create a sense of depth, experiment with layering your compositions. Place elements in the foreground, mid-ground and background to draw the viewer’s eye through the image. For instance, shooting through a school of fish with a diver or coral in the foreground can create a more immersive experience.
Additionally, consider using techniques like “panning” to convey movement and energy. Panning involves following the movement of the fish with your camera while using a slower shutter speed. This technique can create a beautiful blur effect, emphasising the speed and grace of the schooling fish while keeping your subject relatively sharp.

7. Post-Processing Techniques for Stunning Results
Once you’ve captured your images, the work doesn’t end there. Post-processing is a crucial step in enhancing your underwater photography. Editing software like Adobe Lightroom or Photoshop can help you adjust exposure, contrast and colour balance to bring out the vibrant hues and details that may have been lost underwater.
Start by correcting any exposure issues. Adjust the brightness and contrast to enhance the depth of your images. Pay special attention to the colours; underwater photography often requires colour correction due to the natural loss of reds and yellows in deeper waters. Use the white balance adjustment to bring back the warmth that might be lacking in your original shots.
In addition, consider cropping your images to improve composition. Sometimes, removing distractions from the edges of the frame can significantly enhance the focus on the school of fish. You can also use sharpening tools to accentuate the details of the fish and the surrounding environment, making your images more impactful.
Finally, explore creative options such as adding vignetting to focus attention on your subject or using local adjustments to enhance specific areas of your image.

Species in the Andaman Sea and How to Photograph Them
The Andaman Sea offers a treasure trove of schooling fish, each species presenting unique photographic opportunities. Here’s a guide to some of the most iconic species and how to capture their beauty.

Bigeye Trevally
Found in large, swirling schools, these silver fish reflect light beautifully. Position yourself at the edge of the school and shoot upwards for a dynamic shot that emphasises their synchronised movements. Use side lighting to highlight their metallic sheen.

Barracudas
Schools of chevron barracudas form striking, spiralling formations. A slow approach is essential to avoid scattering them. Wide-angle shots from below the school against the surface create dramatic compositions.

Fusiliers
These small yet colourful fish create vibrant, flowing ribbons of colour. Look for schools near coral reefs and shoot mid-water with natural light to capture their iridescent hues. Experiment with slower shutter speeds to emphasise their motion.

Unicornfish and Powder Blue Surgeonfish
These species are often seen grazing on reefs or schooling near drop-offs. Their bright colours and unique shapes make them excellent subjects for close-up shots. Use a balanced strobe setup to highlight their vivid patterns without overexposing.

Snappers
These schools resemble curtains of golden-yellow hues. For a dramatic shot, frame them against a contrasting reef or open blue water. Approach slowly to avoid disturbing their tight formation.

Emperor Fish and Feeding Frenzies
Witnessing a feeding frenzy is a spectacular experience. Schools of emperor fish in a frenzy create chaotic yet mesmerising scenes. Use a fast shutter speed to freeze the action and capture the energy.

Sweetlips
Sweetlips are perfect for head-on portraits. These fish face the current and hold their position, making them cooperative subjects. Approach slowly and use a medium aperture, around F8, for sharp, detailed shots of their faces.

Schooling Bannerfish and Moorish Idols
These colourful fish add vibrancy to any composition. Capture them against coral reefs for a burst of colour, and use a wide aperture to blur the background slightly, making their patterns stand out.

Batfish
Batfish are also super-photogenic species that often let photographers approach closely without scattering, making them ideal subjects. A diver positioned in the middle of a batfish school can beautifully demonstrate the size and density of the group. If visibility allows, this composition creates a striking contrast between the diver and the fish, giving a sense of scale to your shot.
Understanding Fish Schooling
Fish school for protection, communication and efficiency. Their synchronised movements deter predators and enable efficient foraging. Schools operate through decentralised decision-making, with individual fish reacting to their nearest neighbours. This complex yet instinctive behaviour creates the mesmerising patterns we observe.
Understanding this behaviour allows photographers to anticipate movements and position themselves for the perfect shot.
Conclusion: How to Photograph Schools of Fish Like a Pro
Photographing schools of fish is a rewarding endeavour that combines technical skills with artistic expression. By understanding your equipment, mastering lighting techniques, predicting fish behaviour and employing effective composition strategies, you can capture stunning images that showcase the beauty and grace of these underwater wonders.
With practice, patience and a willingness to experiment, you can create breathtaking photographs that tell a story and transport viewers into the vibrant world beneath the waves. Remember, every dive is an opportunity to learn and grow as a photographer, so embrace the journey and enjoy the beauty of the underwater realm.

Discover More
- Marine Life of the Andaman Sea – discover the incredible fish and other marine life you may encounter while diving in the Andaman Sea.
- Diving in Thailand – explore some of the best places to dive in the Thai Andaman Sea.
- Incredible Cephalopods – discover some of the stranger and more fascinating creatures encountered underwater.